The segmentation module is where you create and define custom visitor segments in a Relatude installation, and get reports about those visitor segments.
What is visitor segmentation?
Segmentation/visitor segmentation is the process or splitting the visitors to a website into different segments. Each segment has a number of different conditions that are evaluated to see if the visitor is a match for the segment. The conditions can be basically anything, from which browser the visitor is using to the city they are located.
How to define visitor segments in Relatude
Visitor segments are created in the segmentation module (note that this module is not part of all Relatude licenses, so you might need to upgrade your license to get access to it), so the first step is to switch to the Segmentation module. The default tab in the module is a dashboard. If this is the first time you're using the module, the dashboard is empty. See the dashboard configuration page to learn how to configure and/or write extensions for it.
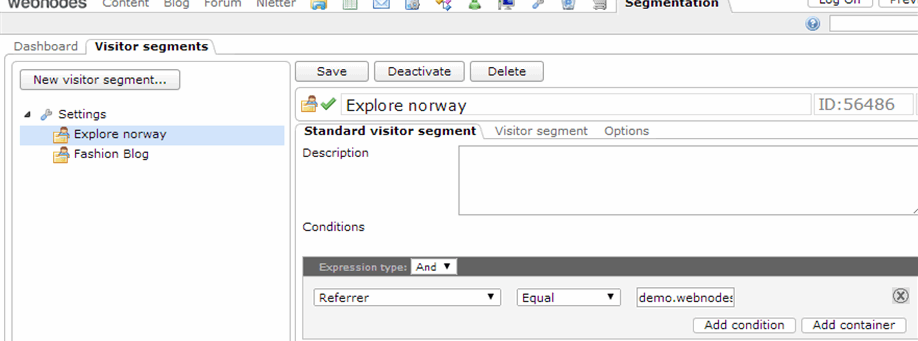
To define segments, choose the Visitor segments tab. The contents of the tab will be similar to this:

Note that there will not be any segments defined by default. In the screenshot above, you can see there are two segments defined. The Explore Norway visitor segment which has been opened has one condition defined. Visitors coming to the site where the referrer of "demo.webnodes.com" will be a match for this segment.
To add a new segment, click the button "New visitor segment" on the top left corner.
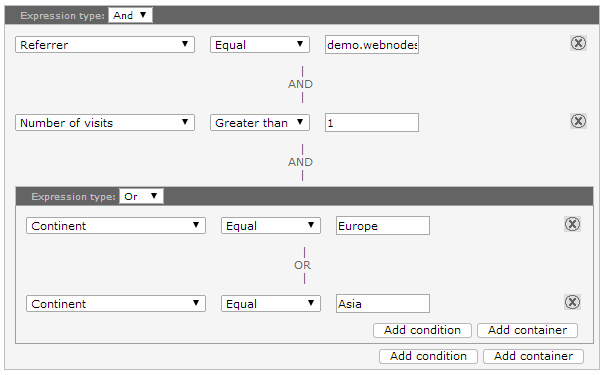
You can define more than one condition in a segment, and the conditions can form an expression that is evaluated once each request. This is an example of a more complex visitor segment: 
This will match for users that come from "demo.webnodes.com", where this isn't their first visit, and they come from Europe or Asia.
Matching segments with visitors
Relatude tries to match the segments you have defined with the visitors to the site. All the segments are evaluated at the start of each pageview to see if the current user is part of any of the segments. The abstract class VisitorSegment has a method IsMemberOfSegment that is called for all segments in the system.
You can inherit from the VisitorSegment class, and implement the IsMemberOfSegment method and have full control over how a segment is evaluated.
The only segmentation content class available to create out-of-the-box is the StandardVisitorSegment. This inherits the VisitorSegment content class, and adds the Conditions property. The IsMemberOfSegment method of a StandardVisitorSegment evaluates conditions expression to determine if it is a match or not.
The matching segments are available on the WAFContext.Request.MatchingVisitorSegments property. Since all personalization is automatic, you normally don't need to access it, but it can be useful for debugging.
Personalized content
In the section above, we saw how Relatude is finding matching segments. But that by itself doesn't provide any benefits. The segmentation is used in conjunction with personalization. In this context that means that you can create versions of content in Relatude that is only shown for the matching segment of visitors.
The content versions that are shown for segments can be done to any content in Relatude, as long as the revision system has been enabled for the given content class. Relatude uses the revision system to store personalized versions of the content.
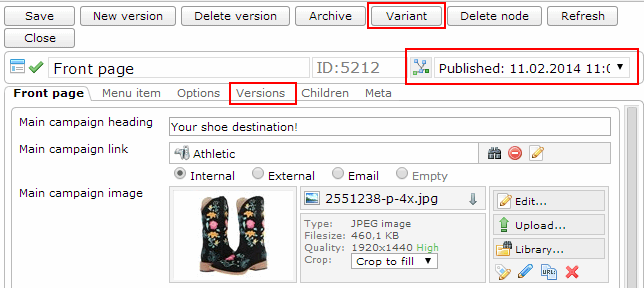
When the revision system has been enabled, there are some changes:

As you can see in the screenshot above, there are a few points to note:
- You get a variant button where you can create a variant of the published revision, that will be shown to a segment you get to choose.
- The dropdown shows the currently selected revision. All the variants used for segmentation and personalization will start with "Variant: ".
- The Versions tab contains a list of all versions of the current node in an interface with a bit more information than you get in the dropdown.
Relations and personalized content
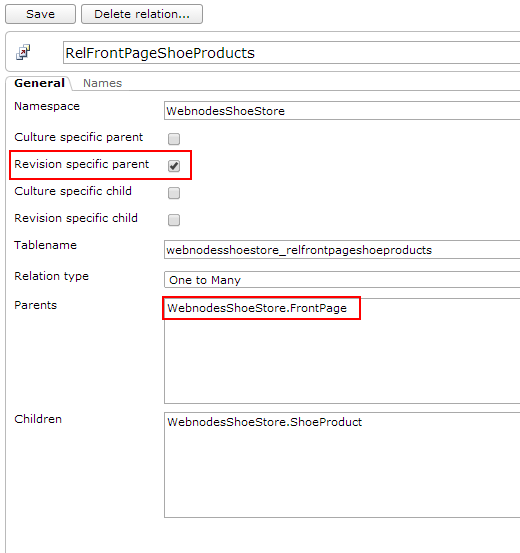
Regular properties are possible to personalize without any special considerations. Relation properties are a special case, and you need to make sure the settings for the relation is set correctly in order for it to work. If we take a look at a relation defined in the relation tab in the ontology moduel, we see this:

In the relation above, we have set the "Revision specific parent". This is from the Shoe Shop demo site. The frontpage has a "SpotlightProducts" property that is the list of products that are hightlighted on the frontpage. This means we need to be able to relate to different Products for different variants of the frontpage. This means that we had to check the Revision specific parent property.
Choose segments with care
When first starting out, it is easy to create a large number of segments to cover all the segments you can think of. In our experience, this will lead to bad results. Problem number one is that it will mean a lot of work to setup and maintain a lot of different content version around the site. Another problem is that it is hard to get actionable insights from a lot of segments.
We like to think of our key audiences, and think about how we can best create a segment that matches each of them. This will also probably align better with your overall company wide marketing efforts.